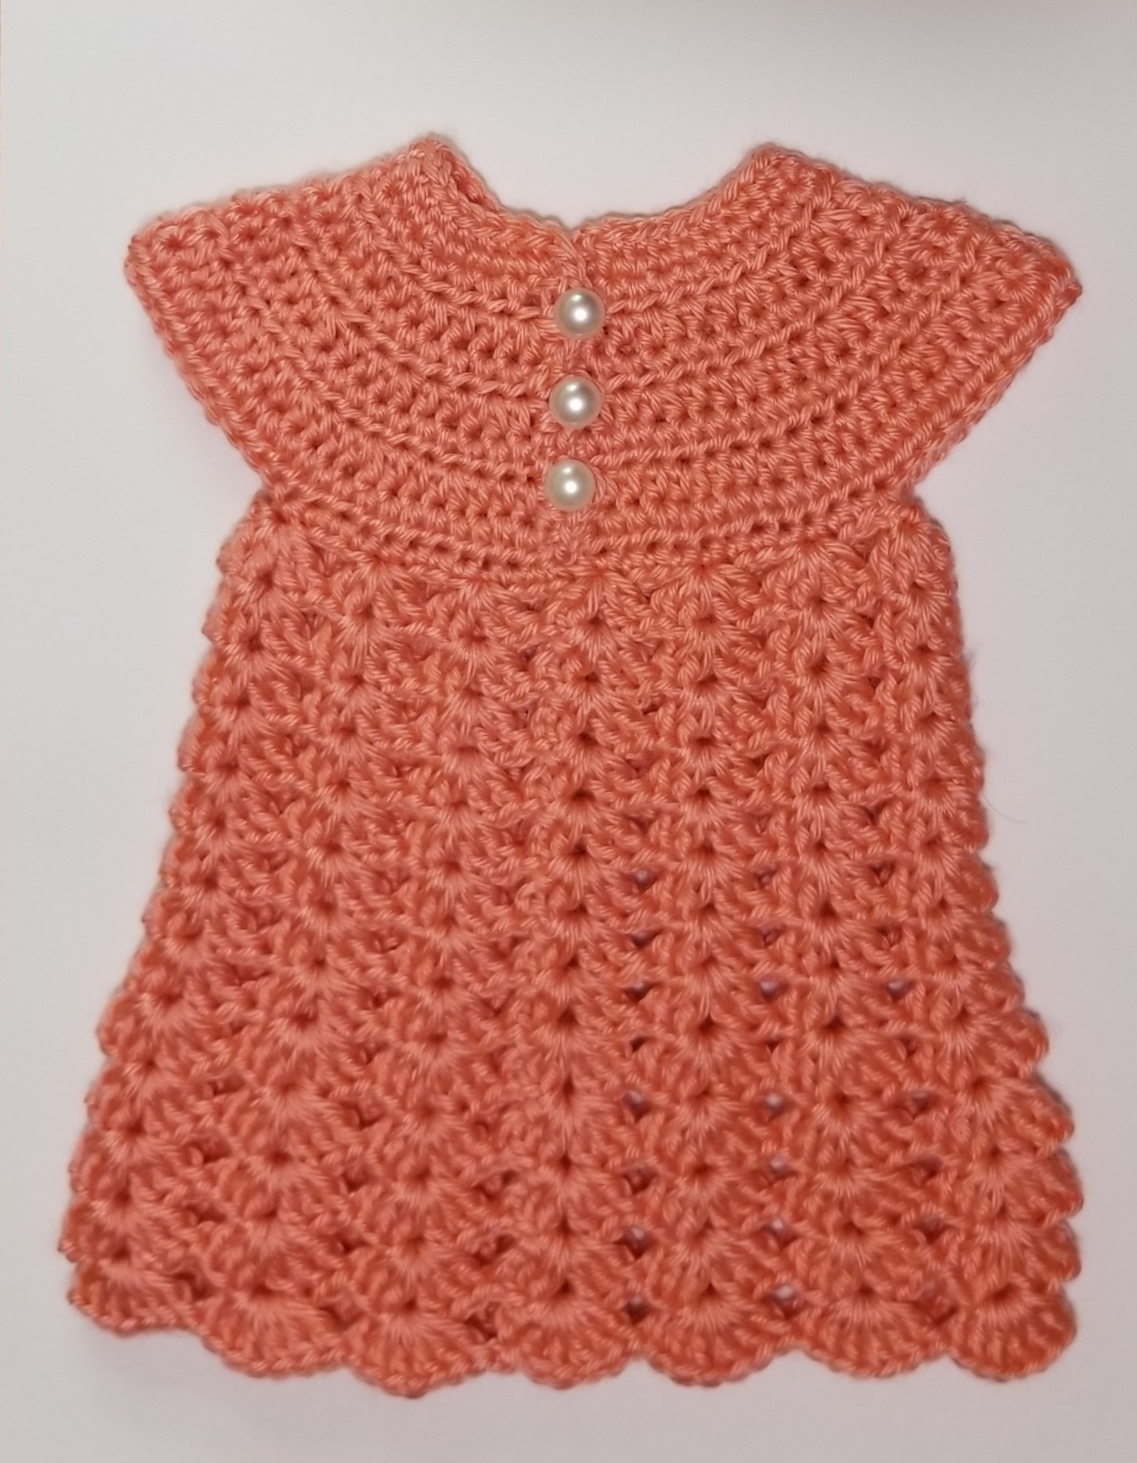
Dress with Buttons for 18″ and 14.5″ Doll
This is a FREE pattern for you to enjoy!

Buttons may be worn facing front or back of dress. Make it long or short. You can snaz it up by using different colored yarns for stripes or contrasting yoke and skirt. Add bold contrasting buttons or try adding an optional tie closure if buttons are not available to you. It’s never too early to make dresses to give as birthday or holiday gifts to all your little “dolls”!
*Please Note: (Adjustments for 14.5 inch doll are written in italics throughout the pattern.)
MATERIALS:
- 1 skein Caron Simply Soft Yarn in any color or variety — 160 to 200 yards needed for basic dress, more will be required for lengthened skirt. (For 14.5 inch doll use Size 3 crochet cotton thread. Model is wearing Aunt Lydia’s Fashion 3 Warm Teal)
- F / 3.75 mm Crochet Hook, or size to obtain gauge. (For 14.5 inch doll, use 2.1 mm steel crochet hook.)
- 3 buttons, 13 mm. Dome buttons work best. (For 14.5 inch doll, use 10 mm buttons.)
- Plastic yarn needle
- Needle and thread to attach buttons
STITCHES
- ch — chain stitch
- sl st — slip stitch
- Sc — single crochet
- hdc — half double crochet
- dc — double crochet
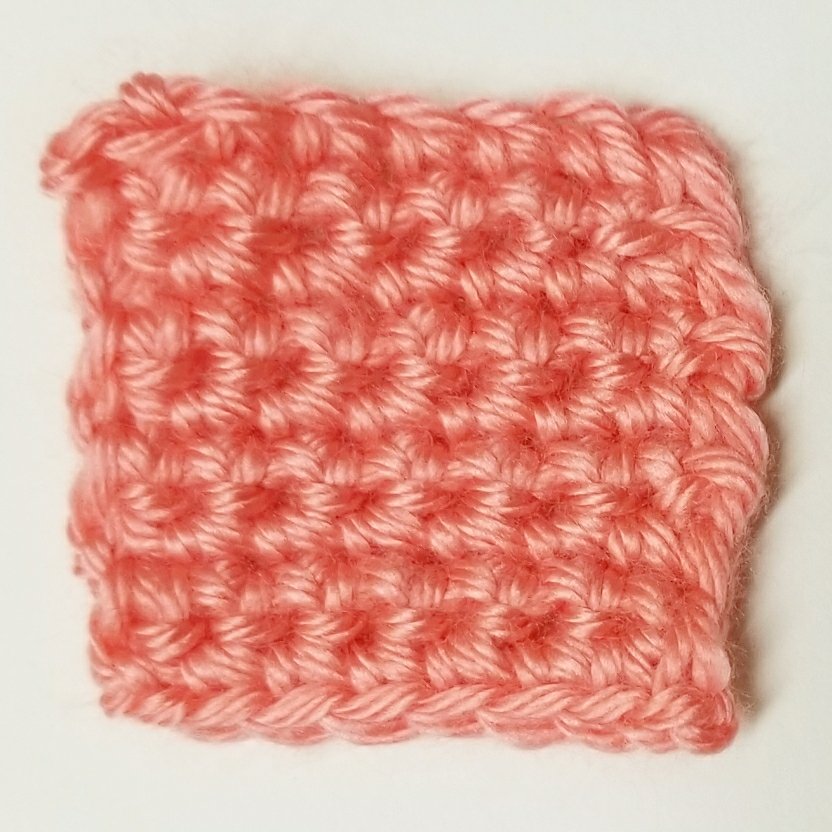
GAUGE: 7sc x 9 rows = 2 inches for 18 inch doll
YOKE INSTRUCTIONS
You will start with a simple straight chain (at doll’s neck) and gradually increase with each row until the yoke becomes circular and has 94 hdc stitches on the last (outer) row. (For 14.5 inch doll, follow yoke instructions as written using #3 cotton thread and 2.1 mm steel hook.)
Row 1: Chain 41, sc in 2nd ch from hook, sc in each ch across row. 40 total sc. Ch 2, turn.
Row 2: 1 hdc in each sc across. 40 total hdc including beginning ch 2. Chain 2, turn.
Row 3: 1 hdc in very first hdc at the base of the ch 2; 1 hdc in next hdc. *2 hdc in next hdc, 1 hdc in next hdc, 1 hdc next hdc*. Repeat from * to * across row. hdc in last 2 hdc of row. 53 total hdc including beginning ch 2. Ch 2, turn.
Row 4: 1 hdc in very first hdc at base of the ch 2, 1 hdc in each hdc across. 53 total hdc, including the ch 2 at the beginning of row. Ch 2, turn.
Row 5: 1 hdc in very first hdc at base of the ch 2. 1 hdc in next hdc, *2 hdc in next hdc, 1 hdc in next hdc, 1 hdc in next hdc*. Repeat from *to * across row. In the last two stitches of row: 2 hdc in next hdc, 2 hdc in last stitch of row. 71 total hdc, including ch 2 at the beginning of row. Ch 2, turn.
Row 6: 1 hdc in very first hdc at base of the ch 2, 1 hdc in each hdc across. 71 total hdc, including the ch 2 at the beginning of row. Ch 2, turn.
Row 7: 1 hdc in very first hdc at base of the ch 2. 1 hdc in next hdc, *2 hdc in next hdc, 1 hdc in next hdc, 1 hdc in next hdc*. Repeat from *to * across row. In the last two stitches of row: 1 hdc in next hdc, 2 hdc in last stitch of row. 94 total hdc, including ch 2 at the beginning of row. Ch 2 turn.
Row 8: 1 hdc in very first hdc at base of the ch 2, then 1hdc in each hdc across row. 94 total hdc, including ch 2 at beginning of row.
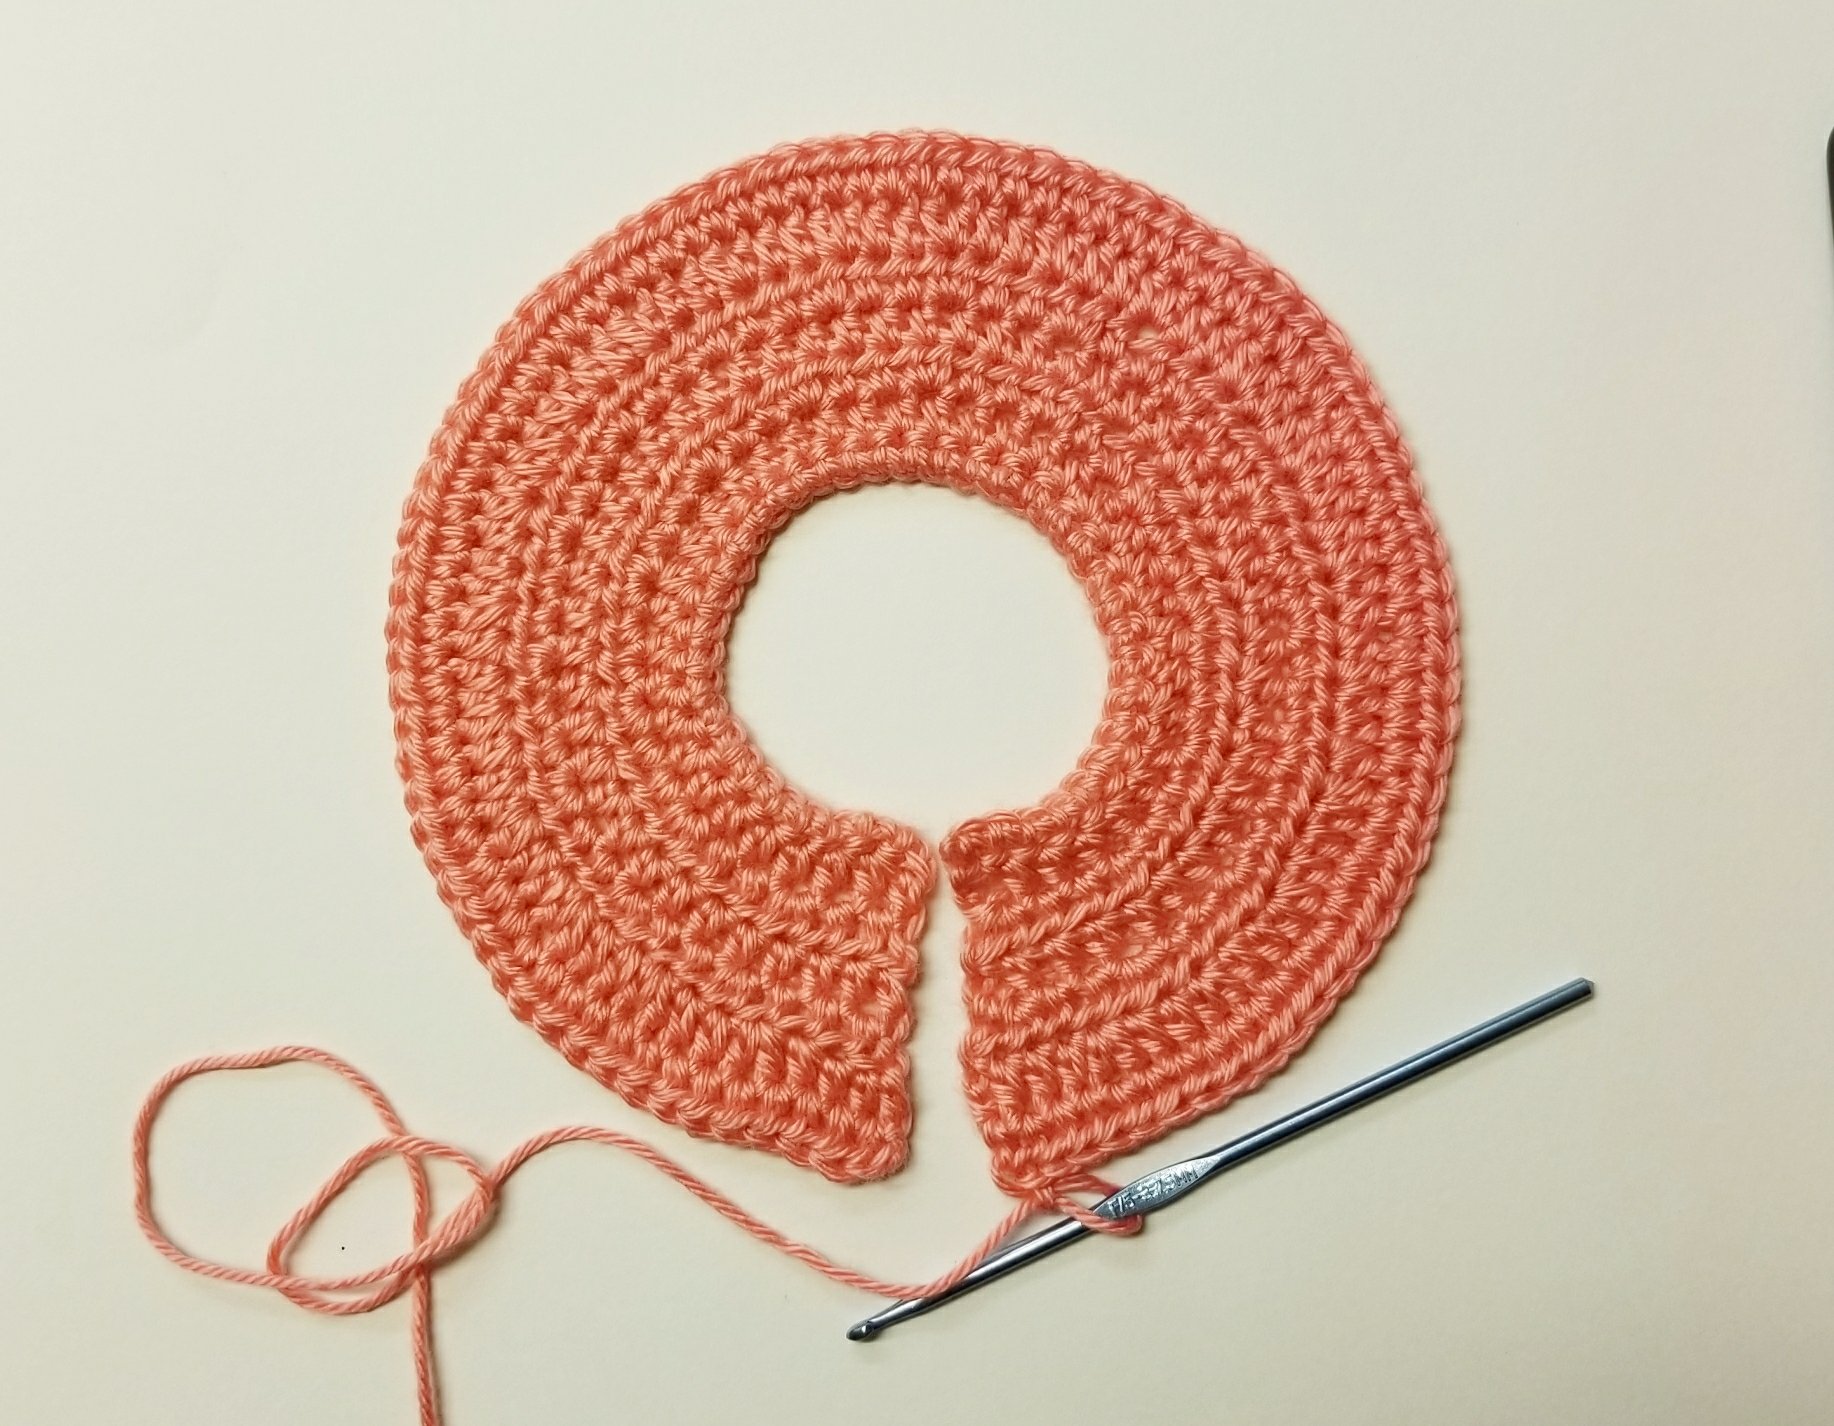
At this point, the important thing is to have 94 stitches to work with. Do not be alarmed if the 2 edges are not perfectly straight and even. We will return to work on them some more later.
SKIRT INSTRUCTIONS ( For 14.5 inch doll, follow instructions through Row 17. Add 4 more shell rows for a total of 12 shell rows, then complete instructions for Row 18 twice. Fasten off and skip to Button Band Instructions.)
Row 9: Ch 1, turn. 1 sc in the very first hdc at base of the ch 1, 1 sc in each of the next 12 hdc, ch 3, skip 22 hdc, 1sc in each of the next 25 hdc, ch 3, skip next 22 hdc, 1 sc in each of the next 12 hdc. 56 total stitches. Join with sl st into beginning sc of row. (This space is smaller than you are used to from the hdc rows) Yoke is now joined as in Figure 2. Now we will begin making the skirt portion of the dress.
Row 10: Shell [Ch 3 (counts as dc), dc, ch 1, 2 dc] in same stitch as joining. Skip 3 stitches. *Shell [2 dc, ch 1, 2 dc] in next stitch, skip 3 stitches*. Repeat from * to * 12 more times. Join with sl st at top of ch 3. 14 total shells made.

Rows 11: sl st into ch 1 space of shell. Shell [Ch 3 (counts as dc), dc, ch 1, 2 dc] in same space. *Shell [2 dc, ch 1, 2 dc] in next ch 1 space*. Repeat from * to * 12 more times, making shells in each of the ch 1 spaces around. Join with sl st in top of ch 3. 14 total shells made.
Rows 12 through 17: Repeat row 11. Lengthen or shorten dress by adding or subtracting rows here.

Row 18: Complete 2 sl st to get to ch 1 space. In same space make shell [Ch 3 (counts as dc), 2dc in same stitch, ch 1, 3 dc in same stitch]. *Shell [3 dc, ch 1, 3 dc] in next ch 1 space. Repeat from * 12 more times. Join with sl st in top of ch 3. 14 total shells made.
Rows 19 through 22: Repeat Row 18. Fasten off. Weave in ends. Trim.
BUTTON BAND INSTRUCTIONS (Button Band instructions are the same for both 18 inch and 14.5 inch dolls, except for button size.)
Use a slip stitch to attach yarn to dress’s top left (your top right, looking at front of the dress) into the top stitch of the V neck. Ch 1, evenly space 12 sc into the end stitches of each row until you reach the bottom of the V. 12 total sc evenly spaced total.
Now make button holes by crocheting up the right side (your left) of the V-opening. Evenly space 3 sc, 3 ch, 3 sc, 3 ch, 3 sc, 3 ch 3sc to the top and into the chain stitch at the neck. 12 total sc evenly spaced and 3 button loops made.
Sc into each beginning ch stitch around neck. Join with sl st at top left of V. Fasten off. Weave in ends. Trim.
Use small needle and thread to hand sew 3 buttons (1/2 inch or 13mm) to dress’s left side, corresponding to location of button holes loops on the dress’s right side. Enjoy your new doll dress.
Pattern and photos (c) 2017 to present Patricia J. Angus of Granny’s Crochet Shoppe. All rights reserved. Pattern and photos may not be reproduced or distributed in any manner. Please make as many doll dresses as you desire to sell in your shops and for fundraisers! Please include a link to http://grannyscrochetshoppe.com when possible. THANK YOU!
